
Are you looking for something other than the classic Gutenberg widget to build your sidebar? We’re here to help! Today we are going to discover how to use Kadence Blocks to design our sidebar and how to insert a table of contents or promotional material.
This post is a part of our Kadence tutorials.
Designing Kadence Sidebar
A sidebar is one of the most powerful features to add to your website.
By enabling the sticky sidebar, you ensure that the reader can have access to your key feature anywhere on your post, page or archive. You can level up your site navigation and create a perfect user experience by adding a sticky table of contents, or boost conversions via implementing a link or form.
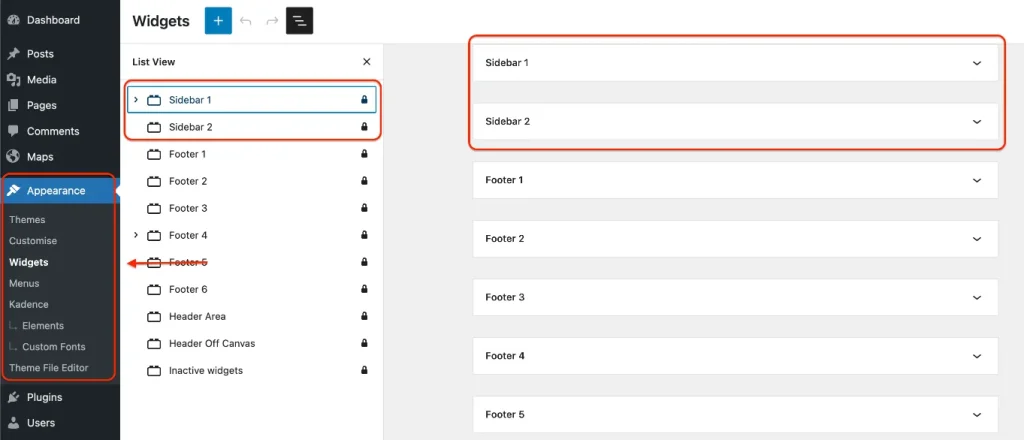
With the free Kadence theme version, we have access to two different Sidebars (Sidebar 1 and Sidebar 2). This is great if we want to use two types of sidebar, for example – if we have two different categories in our website.
With the Kadence Pro version we have access to Hooked Elements. This creates the possibility to have different Sidebars for each category or tag. A very strong bonus if you want the best conversion for each page of your website!
Using Hooked Elements has personally been a real game-changer for myself when building our own website. As someone who is not a professionally-trained web designer, I found it really easy to understand and use this feature. It allows you TOTAL control over what you want to show, and where and when you want to show it on your site, WITHOUT spending hours customising each and every page.
If you’re interested to take advantage of this incredible feature for your own website you can have a look at the different bundles Kadence offers for creators here.
1.Wordpress widgets
To start we need to go to Widgets on our WordPress in Appearance > Widgets. Select the Sidebar that we want to use (Sidebar 1 or Sidebar 2).
2.Use Kadence Blocks to design your sidebar
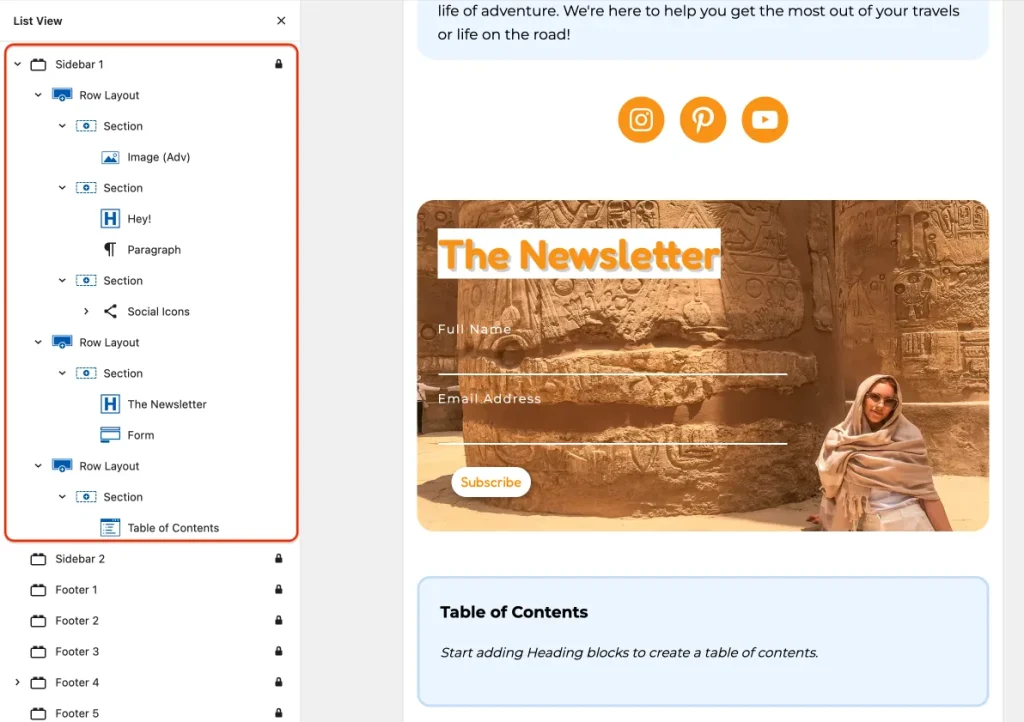
After adding your first Row Layout, you have entered into the sandbox of Kadence. With the Kadence blocks you have the possibility of creating your perfect sidebar.
If you still feel restricted by the constraints of the free version of Kadence, you can try Kadence Blocks Pro with a 30-Day satisfaction guarantee.
Here is a Sidebar Template that you can follow with the List View.
3.Use Hooked Elements
For the next step, we will be needing the Pro version of Kadence.
Before, we mentioned that Kadence Pro version gives you the possibility to have a different sidebar for each category or tag on your WordPress site. This is a truly amazing feature for those looking to customise the stylisation based on which section of your site your visitor is interacting with.
In this section, we explain how to use the Hooked Elements plugin from Kadence Pro. We’ll use this to create each sidebar and link it to our category or tag.
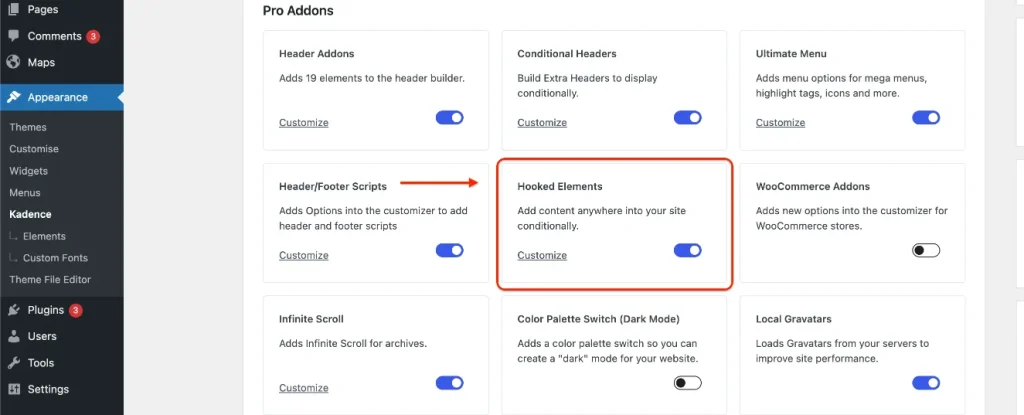
Activate Hooked Elements
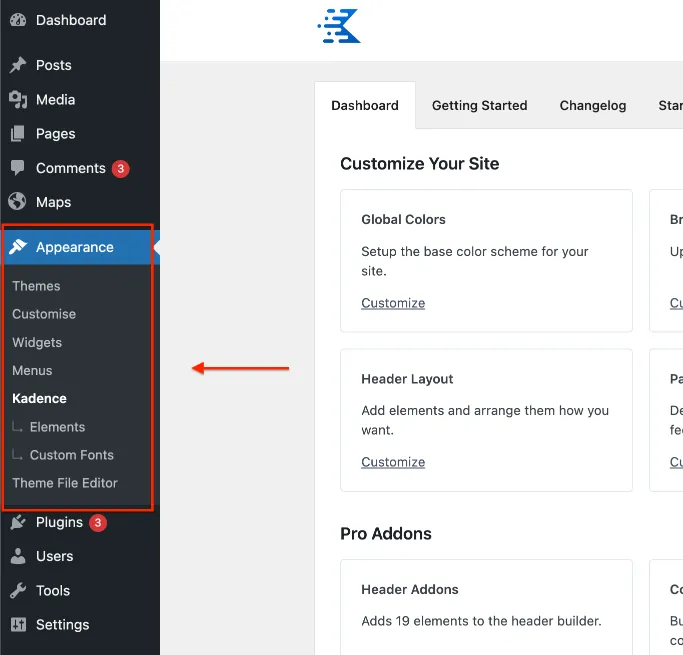
To activate Hooked Elements on WordPress, we need to click on Kadence in Appearance and toggle it on.
Use Template
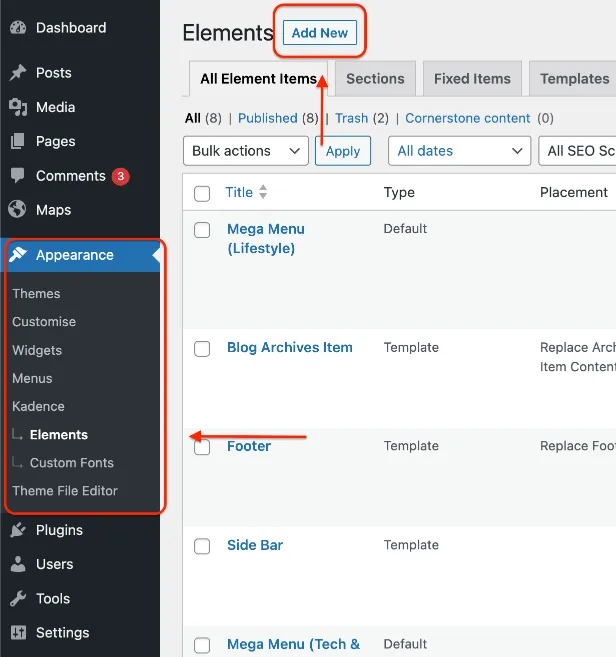
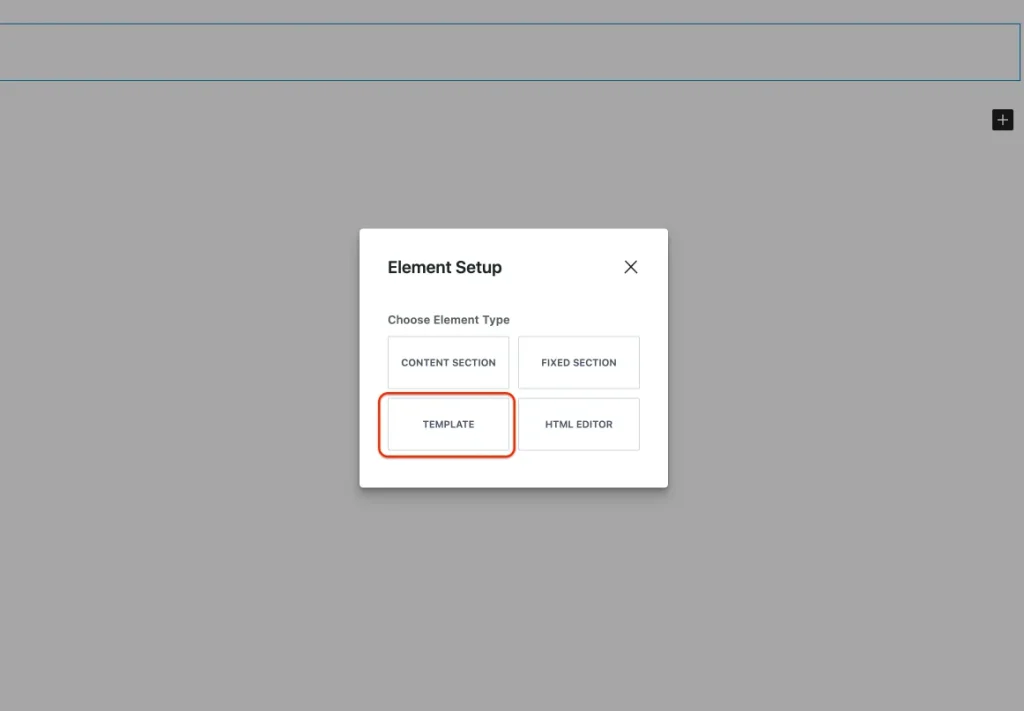
At this stage we simply have to go to Appearance > Elements and ‘Add a New Element’ as ‘Template’.
Choose the Visibility
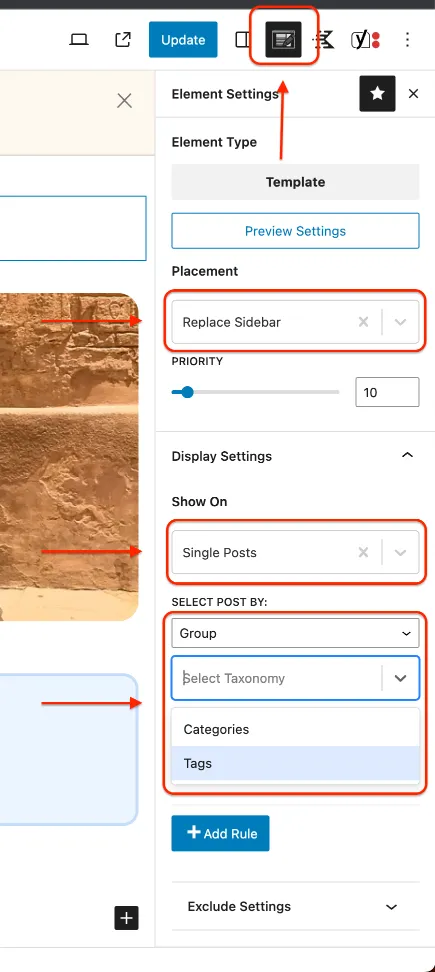
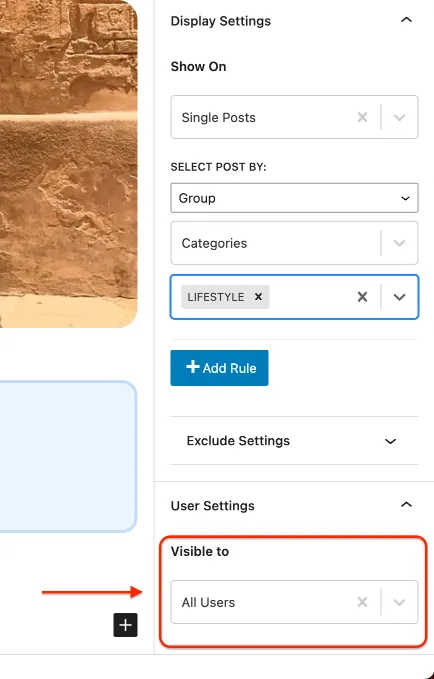
To show our Sidebar on different categories or tags, we need to go to Element Settings > Show On ‘Single Post’ or ‘Single Page’ and Select Post By ‘Group’ > ‘Categories’ or ‘Tags’.
The final thing that we have to do to activate our new sidebar is make it Visible to ‘All Users’.
Use Tags within Categories
This part may feel a little like Inception – hang in there.
In the event that we use a different sidebar for different categories, we can use tags to have a different sidebar in different tags from a category. For example: we can add an affiliate disclosure for only the posts including affiliate content in a group or category by using a tag.
Design each Sidebar
We won’t linger too long on this part.
Here, creation is king and you can experiment and design to your heart’s content to create all the different sidebars that you dream of.
You can still follow our template on the last header if you wish!
Customise Sidebar
1.Choose Layout
Now that we’ve designed our sidebar, we need to place it on our page.
First, we go to our WordPress Appearance > Customise.
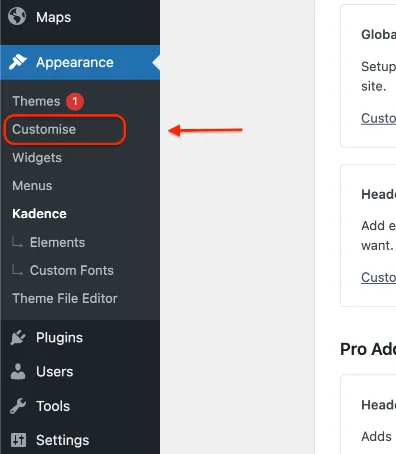
After opening the theme customiser, we go to Posts/Pages Layout and we select our preferences (see below screenshots).
If you are using the Hooked Elements, don’t forget that Hooked Elements will trump the default Sidebar Settings (in the below screenshots) for any post/category/page on which the Hooked Elements are active.
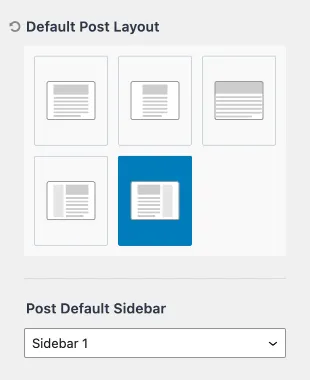
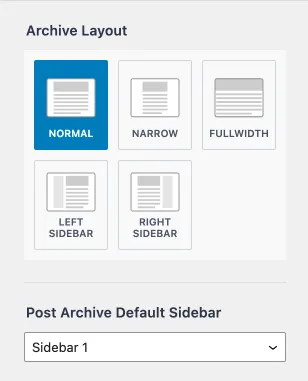
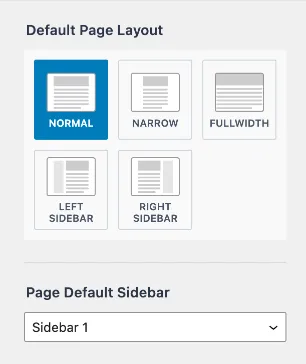
*Remember that your selection above (Sidebar 1/Sidebar 2) will be overridden by Hooked Elements for any post/category/page using it
2.Enable sticky sidebar
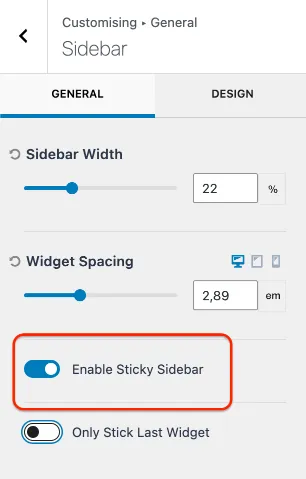
As the theme customiser is still open, we can easily go to General > Sidebar and enable sticky sidebar.
3.Stick only the last Widget
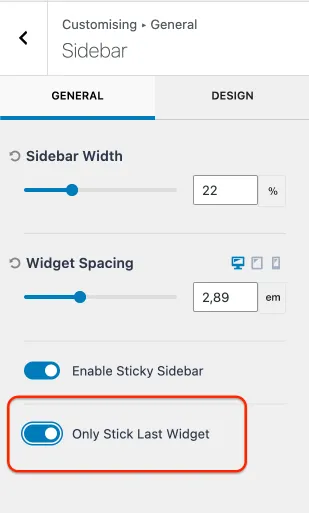
On the same page as before, we simply toggle the last button “Only Stick Last Widget” to ‘On’.
This technique allows us to keep the most important part of the sidebar visible on the entire page or post as the user scrolls down.
As you can see on your right owe decided to stick the table of contents on our website. We feel that this helps the reader to access each part of our post easily.
If you make a post to promote a product you can stick a link or a form instead. You can also stick Google Ads.
4.Stick the two last widgets (or three)
Maybe we want both a Table of contents and a Google Ad to be visible on scroll at the same time in our Sidebar. By using this CSS we can allow Kadence to stick the last two widgets.
@media (min-width: 1024px) /**SET WIDTH ACCORDING TO YOUR LAYOUT**/
 {
    #wrapper {
        overflow: visible;
    }

    .sidebar-inner-wrap {
        display: block;
        height: 100%;
    }

    .sidebar-inner-wrap section:last-child, .sidebar-inner-wrap section:nth-last-child(2)

	 {
     position: -webkit-sticky;
        position: sticky;
        top: 25px; /**PADDING FROM TOP**/
    }
	 .sidebar-inner-wrap section:last-child{
		 top: 300px; /** ADJUST TOP PADDING OF LAST WIDGET ACCORDINGLY **/
	 }

}
If we want to have even a third sticky widget, it is possible using this CSS!
Simply:
- Add a comma & a space directly after nth-last-child(2) in the above code;
- Paste the below code snippet directly after your comma
.sidebar-inner-wrap section:nth-last-child(3)There you have it! Three sticky widgets in your sidebar.
A sidebar is a fundamental element of your site and a great way to provide a quick author bio, easily integrate site navigation, and of course aid you in monetising your page through boosting conversions and seamlessly integrating ads.
Using Kadence to create a tidy but effective sidebar really couldn’t be easier. Anyone can do it!
Give it a try, and let us know how you go in the comments below.
After this tutorial, you might be looking to create a Mega Menu or improve your WordPress speed by using custom fonts. You can click on the tag ‘kadence‘ just below to view our other handy guides.


Thanks for sharing
With pleasure!